 Skip to content
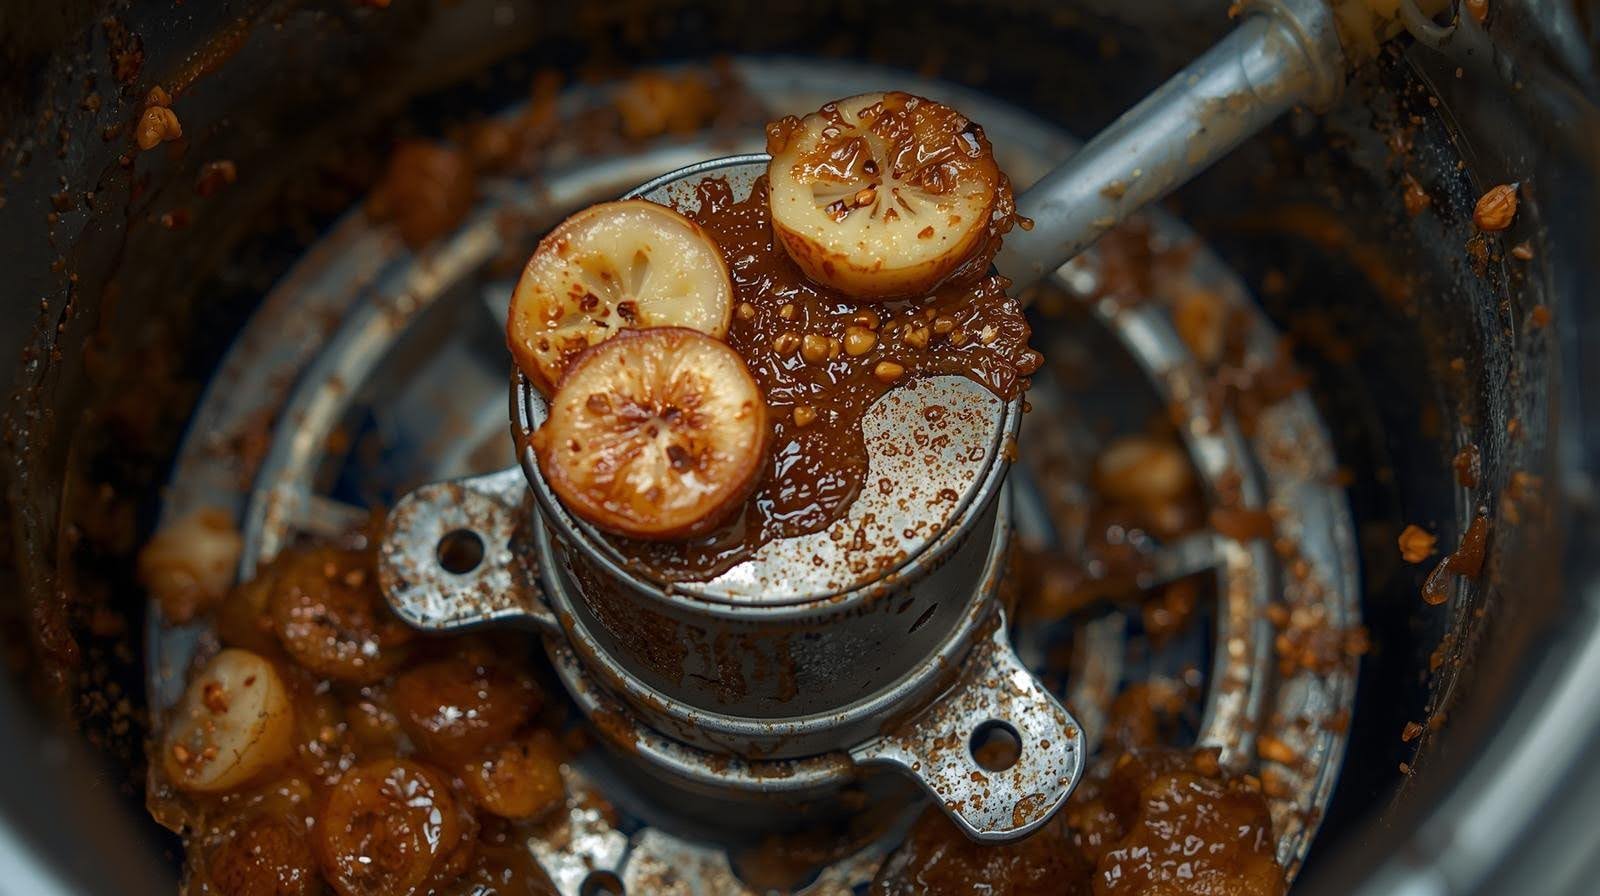
To clean a garbage disposal, first turn off the power, then remove visible debris from the drain opening and rubber baffle. Use a mix of baking soda and white vinegar to break down grime and odor-causing bacteria. After the fizzing stops, flush with hot water. Next, grind ice cubes with coarse salt or citrus peels to clean the grinding chamber and blades. Finish by running dish soap with cold water for 30 seconds to rinse the system. Avoid putting coffee grounds, corn husks, grease, or large food particles into your garbage disposal to prevent future clogs and odors.
Table of Contents
- Why Garbage Disposals Smell and Clog
- What’s Actually Inside Your Garbage Disposal
- Tools and Materials You’ll Need
- Step 1: Cut the Power for Safety
- Step 2: Pull Out Visible Gunk
- Step 3: Scrub the Rubber Baffle
- Step 4: Deodorize with Baking Soda and Vinegar
- Step 5: Flush with Hot Water
- Step 6: Use Ice and Salt to Scrub the Blades
- Step 7: Use Citrus Peels to Freshen the Drain
- Step 8: Final Soapy Rinse with Cold Water
- What to Avoid Putting in a Garbage Disposal
- Why Cold Water Matters More Than You Think
- Signs Your Garbage Disposal Needs Professional Help
- How Often Should You Clean Your Garbage Disposal?
- Final Takeaways: Keeping Your Disposal Clean
- FAQs
Why Garbage Disposals Smell and Clog
Garbage disposals break down food waste, but they’re not magic. Over time, small food particles, grease, and grime build up inside the grinding chamber, cling to the blades, and collect under the rubber baffle. The rubber splash guard is a primary source of persistent odors in the garbage disposal. This buildup is what causes a smelly garbage disposal and can even slow your sink drain.
Even if you run cold water regularly, food can still get stuck in the drain line, especially if you’re disposing of items like corn husks, lemon peels, or coffee grounds that don’t break down easily. The result? A foul-smelling, inefficient disposal system that can back up and affect your entire kitchen sink.
This means regular cleaning is essential for keeping your disposal working properly and your kitchen smelling fresh.
What’s Actually Inside Your Garbage Disposal
Understanding the anatomy of a garbage disposal helps you clean it better.
Here’s what you’re dealing with:
- Grinding chamber – where blades spin to break food into small pieces
- Blades or impellers – not sharp, but fast-spinning metal tabs that mash food
- Drain opening – connects to your sink drain and drain line
- Rubber baffle or splash guard – traps food splashes but hides stuck debris
- Drain line – carries waste water and food particles away
The garbage disposal environment is often dark and wet, which are prime conditions for odor-causing bacteria. This setup means bacteria and residue can hide in multiple places, not just where you see it. Regular cleaning reaches these problem areas and prevents both clogs and odor.
Tools and Materials You’ll Need
Here’s everything you need to clean your garbage disposal the right way:
- Baking soda – at least half a cup
- White vinegar – about one cup
- Ice cubes – fresh ice, enough to fill the chamber
- Dish soap – grease-cutting formula preferred
- Cold water and hot water
- Coarse salt (optional, for scrubbing power)
- Citrus peels – lemon or orange
- Tongs or pliers – for safely pulling out stuck items
- Scrub brush or old toothbrush
- Rubber gloves
- Flashlight – to check inside the chamber
- Cup – for pouring water or soda solutions
Avoid using bleach or harsh chemicals. They can corrode the metal parts of a garbage disposal.
Step 1: Cut the Power for Safety
Never stick your hand into the disposal while it’s connected to power.
Find the switch under your sink or unplug the unit entirely. If it’s hardwired, locate the breaker on your electrical panel and turn it off.
Even though blades aren’t sharp, they move fast. Disposals can cause serious injuries if turned on accidentally during cleaning.
Step 2: Pull Out Visible Gunk
With gloves on and the power off, inspect the drain opening.
Look for:
- Food scraps
- Grease buildup
- Citrus rind stuck under the baffle
- Plastic or small objects dropped by accident
Use tongs or pliers, not your fingers to pull out any stuck items. Flashlights help you see deeper into the chamber.
The rubber baffle is a hotspot for grime. It traps small food particles and greasy foam from dirty dishes. If this part is removable, pull it out and soak it in soapy water while you clean the rest.
Step 3: Scrub the Rubber Baffle
Soak the rubber baffle in hot, soapy water mixed with dish soap. Then use a brush or old toothbrush to scrub it clean. Don’t forget the underside, this is where bacteria thrive.
If your baffle isn’t removable:
- Flip it inside out gently
- Use a toothbrush to scrub both sides
- Rinse with hot water
This step alone removes a surprising amount of odor.
Step 4: Deodorize with Baking Soda and Vinegar
Now it’s time to freshen things up.
- Pour half a cup of baking soda into the drain opening.
- Follow with one cup of white vinegar.
- Let it fizz and foam for about 10 minutes.
This baking soda and vinegar combo breaks down grease, grime, and bacteria inside the chamber and pipes. It also neutralizes acidic smells from spoiled food.
You might hear fizzing or light popping, that’s normal. Avoid turning on the disposal during this step.
Step 5: Flush with Hot Water
Once the fizzing stops, run hot water for 30 seconds to flush out the system. This pushes loosened debris and soda foam through the drain line.
If you have a double sink, plug the opposite drain to ensure all water flows through the disposal side.
Hot water helps dissolve remaining oils and freshens the pipes.
Step 6: Use Ice and Salt to Scrub the Blades
This is one of the most effective mechanical cleaning methods.
- Fill the disposal with ice cubes – about 1–2 trays or a few handfuls of fresh ice.
- Add half a cup of coarse salt (rock or kosher salt works best).
- Turn the disposal on while running cold water.
The ice and salt grind together to:
- Scrape off stuck grime
- Knock loose hardened debris
- Clean the grinding chamber and blades
Run it for about 30–60 seconds. It’ll sound rough at first. This is normal.
Step 7: Use Citrus Peels to Freshen the Drain
After the salt and ice treatment, toss in citrus peels, lemon peels or orange peels work best.
Turn on the disposal and run cold water. As the peels grind, their oils are released, naturally deodorizing the disposal and leaving your kitchen sink smelling clean.
Avoid using thick rinds or too much at once, small pieces work better.
Step 8: Final Soapy Rinse with Cold Water
Pour a few drops of dish soap directly into the drain, then run cold water while turning on the disposal for 15–30 seconds.
This final rinse:
- Flushes out remaining debris
- Coats the chamber with grease-fighting soap
- Leaves the system clean and odor-free
Always use cold water during disposal operation, more on that below.
What to Avoid Putting in a Garbage Disposal
Cleaning your garbage disposal is half the battle. Avoiding the wrong items is the other half. Many clogs and smells come from putting things down the drain that simply don’t belong there.
Here’s what you should never put in your disposal:
Grease, Fats, and Oils
- These cool and solidify inside pipes
- They coat the grinding chamber and drain line, leading to slow draining or complete blockages
Coffee Grounds
- They clump together and act like sludge
- Easily cause buildup that reduces drainage over time
Fibrous Foods
- Corn husks, celery stalks, onion skins, and artichoke leaves wrap around impellers and jam the system
Starchy Foods
- Items like pasta, rice, and potato peels swell with water and turn into paste
- This paste sticks to the inside of your disposal and pipes
Large Bones or Fruit Pits
- Too hard for standard residential disposals
- Can dull or break internal components
Eggshells
- A controversial one, many manufacturers advise against it
- The membrane inside can tangle with the impellers
Non-Food Items
- Never drop twist ties, plastic, rubber bands, or any type of trash into the disposal
Knowing what to avoid putting down the disposal is just as important as knowing how to clean it.
Why Cold Water Matters More Than You Think
You’ve probably heard to run cold water when using your disposal. But why?
Here’s what happens:
- Cold water keeps grease solid, allowing the disposal to grind it and send it down the drain.
- Hot water melts grease, which then cools and hardens inside your pipes, leading to clogs down the line.
That’s why the disposal run should always include cold water, both during and after operation.
Use hot water only during cleaning, not while grinding food.
Signs Your Garbage Disposal Needs Professional Help
Regular cleaning helps prevent major issues, but sometimes, it’s not enough.
Call a professional if you notice:
- Persistent odors that don’t go away after cleaning
- Slow draining even when the sink is otherwise clear
- Unusual noises like grinding, squealing, or metallic scraping
- Leaking from the bottom of the unit (not just at the sink connection)
- Frequent resets or a disposal that won’t stay powered on
These signs often point to deeper mechanical or plumbing problems—cleaning alone won’t solve them.
How Often Should You Clean Your Garbage Disposal?
Regular cleaning keeps your disposal fresh, functional, and free of bacteria buildup. Weekly quick deodorizing clean and monthly deep scrub are recommended for garbage disposal maintenance. It is advisable to perform a deep clean of your garbage disposal every one to three months.
Here’s a simple frequency guide:
| Task | Frequency |
| Remove visible debris | Weekly |
| Scrub baffle and drain opening | Bi-weekly |
| Baking soda + vinegar deodorizing | Every 2 weeks |
| Ice + salt cleaning | Monthly |
| Citrus peel refresh | As needed |
| Full deep clean (all steps) | Once a month |
You don’t need to do all the steps every time, but combining these methods on a monthly basis will prevent most common disposal issues.
Final Takeaways: Keeping Your Disposal Clean
Keeping your garbage disposal clean requires a little consistency and the right techniques. Let’s recap:
- Clean your garbage disposal monthly with baking soda, vinegar, ice, salt, citrus, and dish soap
- Always cut the power before pulling debris or cleaning inside
- Use cold water during operation and hot water only during deep cleaning
- Avoid putting in grease, coffee grounds, fibrous or starchy foods
- Deodorize with citrus peels and scrub the rubber baffle, where most odor hides
Treat your garbage disposal like an appliance, not a trash can. With proper care, it’ll stay clean, efficient, and odor-free for years.
FAQ
No. Bleach can damage the rubber and plastic parts of your disposal and kill helpful bacteria in your septic system (if you have one). Use baking soda and vinegar instead. It’s safer and more effective.
Smells often come from residue under the rubber baffle or deep in the drain line. Make sure you:
- Scrub the baffle thoroughly
- Use baking soda and vinegar
- Run ice and salt through the system
- Finish with lemon peels or orange peels
Yes, in small amounts. Citrus peels help deodorize the system naturally. Just make sure they’re cut into small pieces, and don’t overload the disposal.
First, cut the power. Then:
- Use a plunger on the sink drain
- Try flushing with hot water and dish soap
- Use a mix of baking soda and vinegar, followed by boiling water. If that doesn’t work, you may need to remove the drain trap or call a plumber.
Run cold water for at least 30 seconds before, during, and after using the disposal. This ensures that all ground food particles are flushed completely through the pipes, reducing the risk of clogs.